Use guest access and external access to collaborate with people outside your organization
October 25, 2022Create an Azure CDN endpoint
October 25, 2022In this quickstart, you enable Azure Content Delivery Network (CDN) by creating a new CDN profile, which is a collection of one or more CDN endpoints. After you’ve created a profile and an endpoint, you can start delivering content to your customers.
Prerequisites
- An Azure account with an active subscription. Create an account for free.
- An Azure Storage account named cdnstorageacct123, which you use for the origin hostname. To complete this requirement, see Integrate an Azure Storage account with Azure CDN.
Sign in to the Azure portal
Sign in to the Azure portal with your Azure account.
Create a new CDN profile
A CDN profile is a container for CDN endpoints and specifies a pricing tier.
- In the Azure portal, select Create a resource (on the upper left). The Create a resource portal appears.
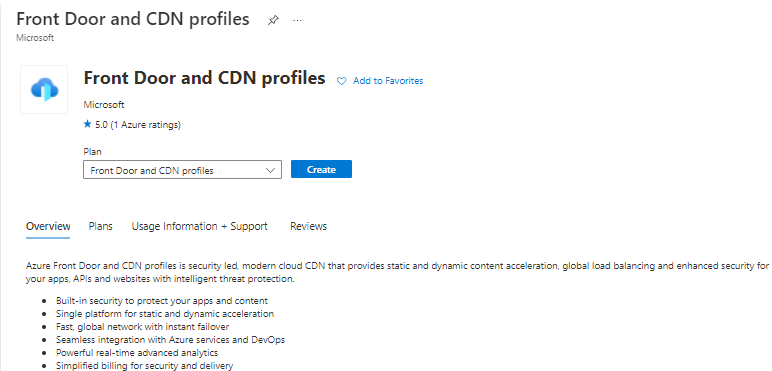
- Search for and select Front Door and CDN profiles, then select Create:
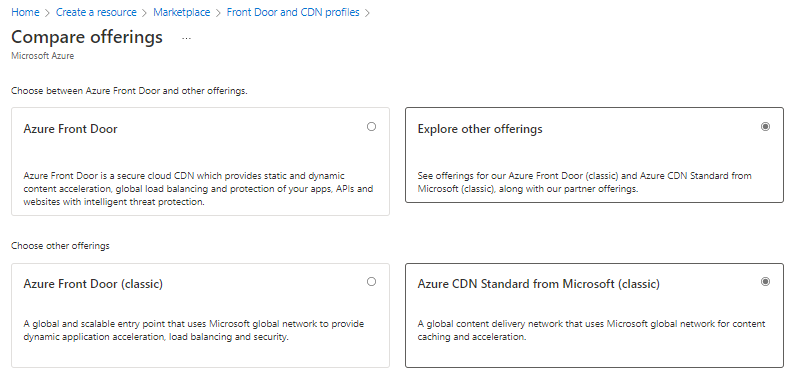
 The Compare offerings pane appears.
 - Select Explore other offerings then select Azure CDN Standard from Microsoft (classic). Select Continue.

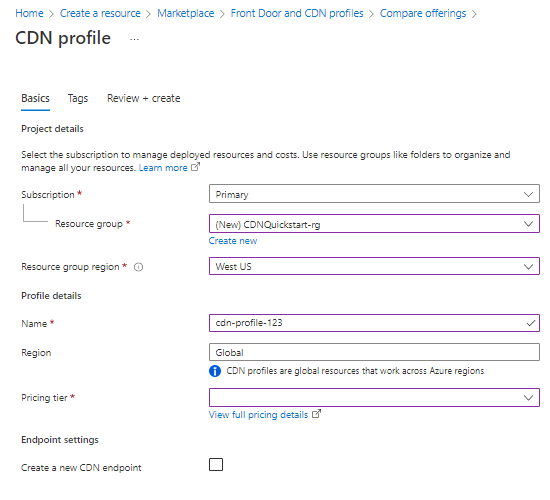
- In the Basics tab, enter the following values:SettingValueSubscriptionSelect an Azure subscription from the drop-down list.Resource groupSelect Create new and enter CDNQuickstart-rg for your resource group name, or select Use existing and choose CDNQuickstart-rg if you have the group already.Resource group regionIf a new resource group is created, select a location near you from the drop-down list.NameEnter your profile name, for example, cdn-profile-123.RegionLeave as default.Pricing tierSelect a Standard Akamai option from the drop-down list. (Deployment time for the Akamai tier is about one minute. The Microsoft tier takes about 10 minutes and the Verizon tiers take about 30 minutes.)Create a new CDN endpoint nowLeave unselected.

- Select Review + Create then Create to create the profile.
Create a new CDN endpoint
After you’ve created a CDN profile, you use it to create an endpoint.
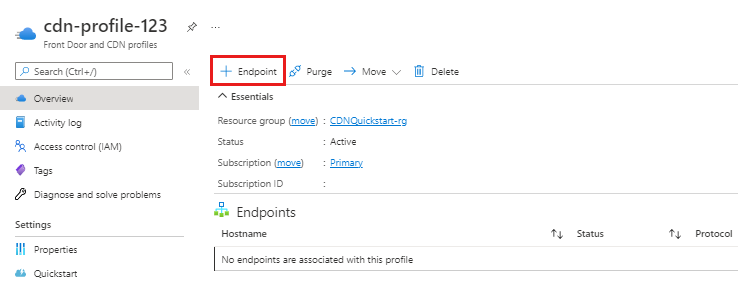
- In the Azure portal, select in your dashboard the CDN profile that you created. If you can’t find it, you can either open the resource group in which you created it, or use the search bar at the top of the portal, enter the profile name, and select the profile from the results.
- On the CDN profile page, select + Endpoint.
 The Add an endpoint pane appears.
 - Enter the following setting values:SettingValueNameEnter cdn-endpoint-123 for your endpoint hostname. This name must be globally unique across Azure; if it’s already in use, enter a different name. This name is used to access your cached resources at the domain <endpoint-name>.azureedge.net.Origin typeSelect Storage.Origin hostnameSelect the host name of the Azure Storage account you’re using from the drop-down list, such as cdnstorageacct123.blob.core.windows.net.Origin pathLeave blank.Origin host headerLeave the default value (which is the Origin hostname).ProtocolLeave the default HTTP and HTTPS options selected.Origin portLeave the default port values.Optimized forLeave the default selection, General web delivery.

- Select Add to create the new endpoint. After the endpoint is created, it appears in the list of endpoints for the profile.
 The time it takes for the endpoint to propagate depends on the pricing tier selected when you created the profile. Standard Akamai usually completes within one minute, Standard Microsoft in 10 minutes, and Standard Verizon and Premium Verizon in up to 30 minutes.
Note
For Verizon CDN endpoints, when an endpoint is disabled or stopped for any reason, all resources configured through the Verizon supplemental portal will be cleaned up. These configurations can’t be restored automatically by restarting the endpoint. You will need to make the configuration change again.
Clean up resources
In the preceding steps, you created a CDN profile and an endpoint in a resource group. Save these resources if you want to go to Next steps and learn how to add a custom domain to your endpoint. However, if you don’t expect to use these resources in the future, you can delete them by deleting the resource group, thus avoiding additional charges:
- From the left-hand menu in the Azure portal, select Resource groups and then select CDNQuickstart-rg.
- On the Resource group page, select Delete resource group, enter CDNQuickstart-rg in the text box, then select Delete. This action deletes the resource group, profile, and endpoint that you created in this quickstart.
